3106.photography
Created 15 October 2005 ... Updated 19 October 2005
|
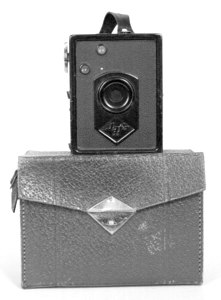
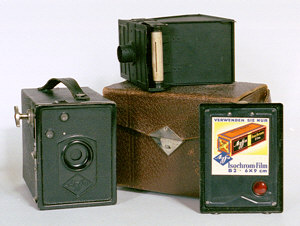
Agfa Preisbox / Box 44
|
|||||||||||||||||||||||||||||||||||||||
 Even though this box camera is one of the most common types in Europe, it's beautiful art-deco and actually of very good quality. Over 1 million were sold and they're not made out of cheap cardboard but it's a full metal version. Many of them still work and many of them still work well. The film type to use acording to th sticker inside is "Agfa B2" but this is equal to 120 roll film so still readily available. Of course picture quality is not as good as the lens is a simple meniscus but the large 6 x 9 cm format helps a little.
As with many box cameras, the lens is not missing but behind the shutter. When you open the camera back, carefully pull out the winding knob half way on the right hand side (seen from the back, maybe you'll have to turn the knob a little) you can remove the insert. On front of the insert is the lens, you might want to clean it. Taking pictures with the camera First you'll need to buy some film, since the shutter speed is between 1/30 and 1/50 and the aperture is about 11, the sunny-16 rule tells you that you'll need ISO 100 negative film for overcast days. For sunny days you might need some ISO 30 film but well, it's hard to get, just use 100 and see what happens. Now that you have film, insert it. Open the back of the camera and take the insert out. Make sure the empty spool is on the top. If no empty spool came with your camera, you can ask the photo shop for one, they might have some. When the spool in the camera is a metal spool or partly wooden, make sure you'll ask it back at the shop when you bring the fuilm in for processing. New spools are made from plastic, the old ones look a lot nicer in the camera :o) Ok, now that the take up spool is on top, take your new film out and break the seal. Make sure not to hold the film on the side as it might unroll itself, thus exposing your new film. Now put the new film in at the bottom. Make sure the paper backing with the printing on is facing you, i.e. the black inside is facing the lens. Now take the paper, pull it around the back and slip the end of the paper in the empty spool which is on top. Turn the spool a few times and/or fold the paper a little in order to make sure it won't fall out. You can now insert the insert again, push in the winding knob, turn it a little and push it in all the way. When you now turn it, the film should move as well. If this is the case, close the back. Look through the red window on the back and wait for the text to appear. When a 1 (or with Kodak an l or |) appears, you're done winding and ready to take your first picture. Make sure it's not on 'Bulb' setting, i.e. the top lever should be down. Point at something interesting and pull the shutter release lever (at the bottom). Up or down is ok, the shutter works in both directions. Wind the film to the next frame by turning the winding know and wait for the number '2' to appear in the red window. Ready to take the next picture. When you are through with the film after picture number 8, wind all the way till you hear the end of the film 'ticking', you'll notice. When you're not sure just continue turning. Now open the back and you'll find the film on the take up spool. Carefully take the spool out, make sure that it doesn't unwind. Lick the end of the small gummed paper, or with the newer films take of the sticker protection, and stick it together so that the film won't unroll. Done... Bring your film to your friendly photo shop or develop it yourself. You'll love your 6 x 9 negatives. |
|||||||||||||||||||||||||||||||||||||||
|
Specifications
|
|||||||||||||||||||||||||||||||||||||||

|
All photos copyright of M. Koning 1997 - 2005
Note: Using the text or images on this site in an auction such as eBay without permission is a violation of your ebay Terms of Service. I will report you to ebay if I discover such a violation taking place. This may result in your account being cancelled. I also reserve the right to file claim for civil penalties.
Return